
|
Cable Railing Tutorial How to install our Cable Railing System 
Give your space a DIY cable railing upgrade. Cable railings can give balconies, stairs, and decks a fresh, contemporary look. In addition to the cool look, this upgrade is also a durable and long lasting choice for your home. The best part is that you can complete this project yourself by following just a few simple steps. Whether your tool belt has had years of experience, or you’re new to home improvement, this tutorial will help you install sleek cable railings without all the troubleshooting. In preparation for your cable railing project or any home additions or improvements, familiarize yourself with local building codes. It is extremely important to reference municipal codes to ensure you are meeting all safety regulations. The first thing you’ll need to get started is our Step 1- Designing and Building the Cable Railing Frame Having a frame in place is the essential first step. Without a secure frame situated properly, the cable railings cannot be installed. The process of building the cable railing frame highly depends on your space and the type of railing you are installing. All posts, regardless of the material of your frame, should be no more than 42” apart. The distance between the posts ensures that you’ll have more room for sagging and bending, which can be very nerve-wracking. Deflection is a natural part of the process when working with cable wires. This unavoidable aspect should be noted during the project. After the framework is established, it’s time for the exciting step of installing the cable wires. Step 2- Installing the Cable Wires To begin installing the cable wires, all you’ll need are cable cutters, pliers, a wrench, a drill, and a crimping tool (pictured below). Since cutters and crimping tools can be pricey, make sure to inquire about renting them from your local rental store. 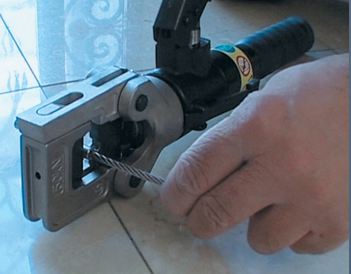
The holes that will be running the wires require precision. The process of drilling these holes requires careful attention and a steady hand. Keep your construction estimating tools on hand for this step. Your tape measure and beam level will definitely come in handy! To help make this process even easier, Indital USA provides in-house pre-drilling of posts per project specs when correct dimensions and drill form are sent in. First, you’ll need to decide how many roles of railing you’ll need. Don’t forget that the cables need to be no more than 4 inches apart, preferably closer to three inches, in order to meet code. Next, you’ll need to space the cables correspondingly to plot the number of cables you need. This is when you mark the spot where you’ll need to drill to ensure accuracy in installation and spacing. A drilling template from Indital USA will help you with the precision of this step. You can also use a piece of plywood to drill the holes in the proper placement. Using plywood or a drilling template will give you a clear reference point to help you drill precisely where you need to be. Now, it’s time to start drilling. After plotting every move, all you’ll need to do is simply drill holes all the way through the post. This step will prepare you for running the cables. Once you’ve completely drilled the holes through the post, you will need to run the cables. This is the easiest part! If all the previous steps have been completed accurately, this step should be simple and seamless. Step 3- Tighten and Trim the Cables Finally, after building the cable railing frame and installing the cable wires, you will need to trim the cables at the exact length required and also tighten the hardware. With Indital USA’s cable railing systems, cutting and tightening the cables and hardware has been simplified. Each set includes bolts, mounts, rails, and everything else needed to complete the full system. Prevent sagging and deflection as much as you can by using the posts, fittings, and other provided materials to stabilize and tighten each railing at every hole. After you tighten the very last railing, you can step back and admire your creation! 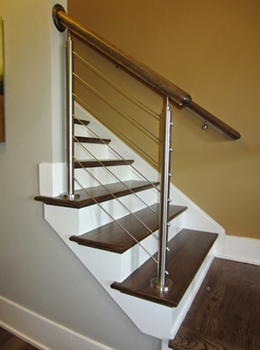
The rewards of do-it-yourself home-improvement projects like this one are endless. Your cable railing project will not only upgrade your home and give it a more contemporary look, but the addition will also be a daily reminder of your hard work and creativity. |